Microsoft Dynamics CRM 2011

Microsoft Dynamics CRM 2011
Showing posts with label Web Resources. Show all posts

Tuesday, April 16, 2019

Dynamics 365 - How to Create a new Entity record using Web API and Javascript in 5 minutes

In this article we describe Step by step  How to Create a new Entity record  using Web API and Javascript in 5 minutes. We'll use the JQuery already loaded by Dynamics 365 on the form.

For this example, we'll create a Contact record, when clicking a button, using a Web Resource locally inside the Form.


How to Create a new Entity record  using Web API and Javascript in 5 minutes


This is the function to Create a Record , using an HTTP POST request: 


var entity = {};
entity.address1_telephone1 = "";
entity.emailaddress1 = "";
entity.lastname = "";

$.ajax({
    type: "POST",
    contentType: "application/json; charset=utf-8",
    datatype: "json",
    url: Xrm.Page.context.getClientUrl() + "/api/data/v8.2/contacts",
    data: JSON.stringify(entity),
    beforeSend: function(XMLHttpRequest) {
        XMLHttpRequest.setRequestHeader("OData-MaxVersion", "4.0");
        XMLHttpRequest.setRequestHeader("OData-Version", "4.0");
        XMLHttpRequest.setRequestHeader("Accept", "application/json");
    },
    async: true,
    success: function(data, textStatus, xhr) {
        var uri = xhr.getResponseHeader("OData-EntityId");
        var regExp = /\(([^)]+)\)/;
        var matches = regExp.exec(uri);
        var newEntityId = matches[1];
    },
    error: function(xhr, textStatus, errorThrown) {
        Xrm.Utility.alertDialog(textStatus + " " + errorThrown);
    }
});


And this is the Web Resource EMBEDDED in the Form (that's why we wrote "parent" before calls to JQuery ) :
1) Open the Form
2) Add > Section > Web Resource
3) Paste inside it the following HTML - JS code:


<html><head>
<link rel="stylesheet" href="https://maxcdn.bootstrapcdn.com/bootstrap/3.3.7/css/bootstrap.min.css" integrity="sha384-BVYiiSIFeK1dGmJRAkycuHAHRg32OmUcww7on3RYdg4Va+PmSTsz/K68vbdEjh4u" crossorigin="anonymous">

<link rel="stylesheet" href="https://maxcdn.bootstrapcdn.com/bootstrap/3.3.7/css/bootstrap-theme.min.css" integrity="sha384-rHyoN1iRsVXV4nD0JutlnGaslCJuC7uwjduW9SVrLvRYooPp2bWYgmgJQIXwl/Sp" crossorigin="anonymous">
<script>

var fnCreateContact = () => {
var entity = {};
entity.address1_telephone1 = "123123123";
entity.emailaddress1 = "www.bender.com";
entity.lastname = "Contact Name";

parent.$.ajax({
    type: "POST",
    contentType: "application/json; charset=utf-8",
    datatype: "json",
    url: parent.Xrm.Page.context.getClientUrl() + "/api/data/v8.2/contacts",
    data: JSON.stringify(entity),
    beforeSend: function(XMLHttpRequest) {
        XMLHttpRequest.setRequestHeader("OData-MaxVersion", "4.0");
        XMLHttpRequest.setRequestHeader("OData-Version", "4.0");
        XMLHttpRequest.setRequestHeader("Accept", "application/json");
    },
    async: true,
    success: function(data, textStatus, xhr) {
        var uri = xhr.getResponseHeader("OData-EntityId");
        var regExp = /\(([^)]+)\)/;
        var matches = regExp.exec(uri);
        var newEntityId = matches[1];

document.getElementById('btnCreateContact').classList.add('disabled');
    },
    error: function(xhr, textStatus, errorThrown) {
        parent.Xrm.Utility.alertDialog(textStatus + " " + errorThrown);
    }
});
}
</script>
<meta></head><body style="direction: rtl; overflow-wrap: break-word;">

<div class="container">
  <div class="jumbotron">
    <h3>Create Contact</h3>   
    <p>This function creates a new Contact</p>
     <button id="btnCreateContact" onclick="fnCreateContact()" type="button" class="btn btn-primary">Create Contact</button>
  </div>
</div>

</body></html>


That's all...
In this article we've seen Step by step  How to Create a new Entity record  using Web API and Javascript in 5 minutes.
Enjoy Microsoft Dynamics 365 CRM!

by Carmel Schvartzman

כתב: כרמל שוורצמן

Sunday, July 5, 2015

How to Add a custom Button to a CRM 2013 Web Form

In this article we see Step by step How to Add a custom Button to a CRM 2013 Web Form .
We'll review here in only 5 minutes how to create an HTML5 Button at the client side Front End , using only javascript, HTML and CSS3:


The steps are as following:
1) create a CRM field to be the container of the button(set its text as ".")
2) create a web resource containing the following javascript
3) call the web resource from your CRM form, sending as argument the name of your container field.


1) Step #1: create a CRM field to be the container of the button:


The button will be located at the CRM field (called "sFieldName" in the following code).
Try to create a new CRM field to parent the button, and set "." as its text. This way the button will fill the field, and you can locate it wherever you want inside the CRM form.

2) Step #2: create a web resource containing the following javascript:

This is the code that creates the Button:
It just retrieves the HTML5 element wrapping the CRM field where you want the button appended to, and creates an element with a custom button:


Create a Web Resource with the following javascript code (note: this code does not depend on jQuery or any other framework: you can copy-paste it as it is):

function fnXRMClientButton(sFieldName)
{   // sFieldName : "new_somefield"
    
    if (document.getElementById(sFieldName) != null) {
         sFieldName = "field" + sFieldName;
         if (document.getElementById(sFieldName) == null)
         {
            var oParentElement = document.getElementById(sFieldName + "_d");
            oContainerElement = document.createElement("oContainerElement");
            oParentElement.appendChild(oContainerElement, oParentElement);
            
            var btn = document.createElement("button");
            var txt = document.createElement("span");
            txt.innerText = "BUTTON TEXT";            
            btn.id = "btnCallAction";
            btn.appendChild(txt);
            btn.style.margin = "10px";
            btn.style.padding = "5px";
            btn.style.width = "300px";
            btn.style.height = "50px";
            btn.style.textAlign = "center";
            btn.style.borderRadius = "5px";
            btn.style.textShadow = "1px 1px 2px #FFF";
            btn.style.color = "#000";
            btn.style.boxShadow = "#a8a3a3 5px 5px 1px";           
            btn.style.border = "1px double #dcdcdc";           
            btn.style.background = "#f5f5f5";
            btn.style.font = "600 14px Tahoma";
            oContainerElement.appendChild(btn);


            document.getElementById(sFieldName).style.width = "0%";
            btn.onclick = function () {
                OnClickActionFunction(oContainerElement);

            };

        }
    }
}


3) Step #3: call the web resource from your CRM form, sending as argument the name of your container field:


fnXRMClientButton("new_somefield")


That's all.  

Happy programming.....

      by Carmel Schvartzman


כתב: כרמל שוורצמן


Monday, October 28, 2013

Step-By-Step How to create a Ribbon Button in CRM 2011

by Carmel Schvartzman
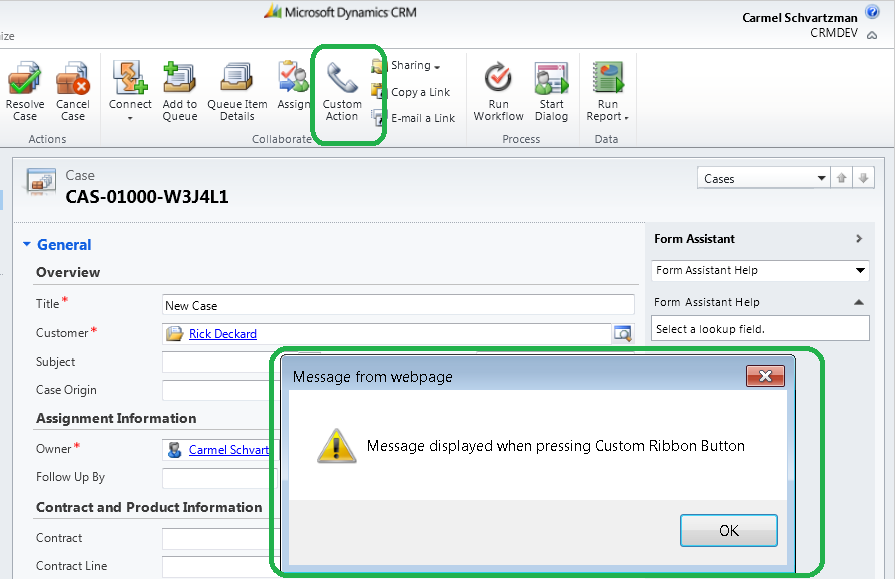
  1. In this walkthrough we will learn how to create a Ribbon Button in CRM 2011. We'll be adding a custom button called "Custom action" to the "Collaborate" group of the Case ribbon. By pressing that button, an action coded in javascript will fire. The javascript code will reside in a Web Resource. A Web Resource is a virtual html, jscript, css, picture or Silverligth file stored in the CRM database, and identified by a unique URL. After its creation, a Web Resource can be used in several CRM Forms, enhancing its functionality and/or appeareance. The custom ribbon button will appear as follows:


How to create a Ribbon Button in CRM 2011

  1. We'll add a button to the ribbon by modifying the XML that defines its structure. In order to do that, we need to get that XML, exporting a solution wich contains the entity form we want to customize. Let's create that solution: press "New" at Solutions:
    How to create a Ribbon Button in CRM 2011
  2. Next, give it a relevant name, and fill the required fields:
  3. Then, Add to the solution the Case by clicking "Add Existing...Entity":
  4. Add to the Solution the Case entity:
  5. Publish the Solution and click on "Export Solution":
  6. Click "Next" and go to the next dialog:
  7. Select "Unmanaged" because we don't want to distribute this solution to other people, and Export it:
  8. Save the ZIP file to some address in your machine:
  9. Find the ZIP file and open it:
  10. From the unzipped folder, we only need to modify the "customizations.xml" file, so make a backup of it, and open the xml in any text editor you like, like Notepad++:
  11. Make a search on it to find the "RibbonDiffXml" element:
  12. Take a close look to it: this element is just a skeleton to create a custom button:
  13. Now let's take a look to the DYNAMICS CRM documentation at MSDN:

  14. In the XML we define the display rules that will guide the action performed by the custom ribbon button we are designing. There is a sample that sets a "DISPLAY RULE" only in case of an entity "Create" action:  ( the "display" rules documentation is here )

  15. There are several rules for the entity state. We need to select the "Existing" option, because we want to apply this button to existing entities:
  16. Find the "RULE DEFINITIONS" element: we'll modify it: ( the "enable" rules documentation is here ))
  17. Therefore, modify the "RULE DEFINITIONS" element as follows:


    This is the code to type:

     <RuleDefinitions>
          <TabDisplayRules />
          <DisplayRules />
         <EnableRules>
          <EnableRule Id="new.EnableRule.NewAction">
            <FormStateRule State="Existing" />
          </EnableRule>
         </EnableRules>
      </RuleDefinitions>
  18. Now, we'll define the ACTION performed by the custom button, so find the "CUSTOM ACTIONS" section:
  19. Again at the CRM documentation, examine the Ribbon Commands elements: ( the "commands" documentation is here  )

  20. You'll find out that we can attach a javascript function to a custom ribbon button in CRM 2011:  ( the "actions" documentation is here ) :
  21. According to the documentation, modify the "CUSTOM ACTION" element as follows:

    <CustomAction Id="new.CustomAction.NewAction" Location="Mscrm.Form.incident.MainTab.Collaborate.Controls._children" Sequence="27">


    Be careful to change the entity logic name to the entity you are intending to customize. In this example, the entity is "Case" and its logical name is "incident". Change it to adapt to your needs. Also, change the "Collaborate" ribbon group to the one you want to add your button to. The "Sequence" is the place inside the ribbon group in wich your button will be displayed, so choose any number greater to the number of buttons in it.
  22. Type some relevant text for the button LABEL and for the TOOLTIP you want to be displayed:

      <CommandUIDefinition>
              <Button Id="new.Button.NewAction"
                      Command="new.Command.NewAction"
                      LabelText="Custom Action"
                      ToolTipTitle="Execute Action"
                      ToolTipDescription="Press the Custom Button to display an JS message"
                      TemplateAlias="o1"
                      Image16by16="/_imgs/Ribbon/Entity16_4210.png"
                      Image32by32="/_imgs/Ribbon/Entity32_4210.png" />
            </CommandUIDefinition>


  23. Now, for the picture in the button, i'll be using a CRM picture, stored in the CRM 2011 site, in the "_imgs" folder:
  24. Add the selected pictures to both 16 pixels and 32 pixels fields:
  25. Now, for the linking between the button and the javascript function, we'll need to customize the "COMMAND DEFINITIONS" element, so find it:
  26. Type the following code , and take a look at the relation between the button and the command definition:

     <CommandDefinitions>
          <CommandDefinition Id="new.Command.NewAction">
            <EnableRules>
              <EnableRule Id="new.EnableRule.NewAction" />
            </EnableRules>
            <DisplayRules>
              <DisplayRule Id="Mscrm.CanWritePrimary"/>
            </DisplayRules>
            <Actions>
              <JavaScriptFunction Library="$webresource:new_ribbonbuttonjs"                     FunctionName="DisplayMsg">
              </JavaScriptFunction>
            </Actions>
          </CommandDefinition>
        </CommandDefinitions>


    As you can see, we'll be using a Web Resource called "new_ribbonbuttonjs", which includes a javascript function "DisplayMsg". We'll build such Web Resource later in this tutorial.
  27. Now let's import back our XML , with the modified ribbon. ZIP the 3 files and ...
  28. ... import them back to CRM 2011:
  29. First browse to the ZIP file folder:
  30. Ignore the warning you'll get :
  31. Import the XML ribbon customizations:
  32. And don't forget to publish the changes:
  33. If you get a FAIL message, check the details for the cause of them:

    For instance, in this case CRM didn't find the Web Resource required
  34. Therefore, let's create that Web Resource. Go to New Web Resource, and give it exactly the same name you set at the XML file:

    Our javascript function will just open an alert window to display a message. Type the function inside the Text Editor of the Web Resource.
  35. Publish the Web Resource:
  36. Finally, open some Case form entity. You'll be acknowledge with our brand new ribbon button:

    Also you'll see the tooltip of the custom control.
  37. And pressing our custom button fires the javascript code we just created:
  38. In this tutorial we saw How to create a Ribbon Button in CRM 2011. That's all...Enjoy Dynamics CRM  !!!


    כתב: כרמל שוורצמן

Tuesday, October 8, 2013

Step-By-Step How to open a local File from a CRM Form

by Carmel Schvartzman

In this walkthrough we will learn how to open a local File from a CRM Form in Dynamics CRM 2011. We'll create a link button on the Main CRM form of the Article entity, to open a file from the local File System.

Although CRM 2011 allows us to add a link to some URL, it won't work for a link to a local file .
So if we need to open a local PDF, DOCX or PNG local file, the way to do that is to turn a string file address into an hyperlink, using a Web Resource written in javascript.

A Web Resource is a virtual html, jscript, css, picture or Silverligth file stored in the CRM database, and identified by a unique URL. After creation, a Web Resource can be used in many CRM Forms, enhancing its functionality and/or appeareance.

Our link button will open a pdf file on our Form: the following snapshop shows how the final form will appear:


  1. To create the link, let's make a new Web Resource:

     
  2. Give the Resource an appropriate name, and write the " _ " before of the display name , making it easier to find our resource between hundreds of files:


    The "Type" of the resource must be "Script". Open the Text Editor, and write the javascript function:


    3. The function will get an "fldName" parameter containing the name of the string field to convert to a link:


    Using the CRM notation, get the string inside the field: Xrm.Page.getAttribute("...").getValue().
  3. After checking whether the string containing the file path is not null, create an anchor html tag ( <a> ) that will hold our path, opening it in a new window ("target=_blank"):
  4. Next, get the control containing the field:


    ...and set our <a> tag as the innerHTML of the control, hiding the original text box control:
  5. Save the Script and Publish the Web Resource. Next, go back to the Article Main form, where we want to add our File attachment link:


    On the Article's form, add a New string Field:


    Select from the list only the custom fields, and drag and drop the new field to the CRM Form:


    Now the field is on the form, but because it will hold a file address, let's expand it to two columns:
  6. Our next task is to add the Web Resource script to our form. Go to "Form Properties":
  7. We need to add the script as a javascript library. On the Properties dialog, go to the Libraries in the Event List:
  8. Inside the Look up Record list, we'll find our script on the top, just because we add the " _ " at the head of the Display name of the Web Resource:
  9. After we added the library, we must select which Event Handler will call the function: Select OnLoad and click "ADD":
  10. Select the library we just added:
  11. Next, type the function name we coded on the script, and the LOGIC NAME of the CRM field holding the file path (remember that the LOGIC CRM name is the same as the SCHEMA NAME but in small caps):

    That's all concerning to the Web Resource.
  12. Now let's see how it works. Create a new article. Fill up the required fields and type the address of the file:

    As you can see, you can input the address in a text box. Save the Article and close the CRM form.
  13. Now open the Article we just created, and you'll see that the address string has been converted to a link to the file:
  14. Click the link and the PDF file will open:


    That's all...Enjoy Dynamics CRM


    כתב: כרמל שוורצמן