- In this walkthrough we will learn Step-By-Step How to use the Advanced Search in Dynamics CRM 2011, and save the search as a Custom View. The Advanced Search allows to perform custom searchs of entity records, export the results to Excel and even save the search as a View for further use. For instance, we could use the Advanced Search to find all the Accounts with a Name containing "Sean":

- So go to Accounts and find the Advanced Search ribbon button:

- The Advanced Search dialog will open. Press the New button OR select "New" from the Views list:

- Because we want to find all the Accounts with a Name containing "Sean", we need to select the "Account Name" field:

- Next add the operator "Contains": (notice you can also select Equals, Begins , Contains Data, and more):

- Next, click over "Enter Text" and type the searched term "Sean":

- Click on "Results" to find out whether we got the expected results:

- We got them, but there is a column we don't need ("Primary Contact"), so let's remove it. Click on "Edit Columns":

- On the Edit Columns dialog, select the column to remove, and click "Remove":

- Now, if we need to retrieve data from another column, click on Add Columns:

- Select the column you need to add:

- Click "Results" again to see the required data:

- Now, we want to see how to save the Advanced Search as a View, for future use, so go to Save As:

- Give the View a relevant name and its Description:

- In the future, you can see the saved View opening the "Saved Views":

- There we'll see our Advanced Search saved as a View:
That's all...Enjoy Dynamics CRMכתב: כרמל שוורצמן
Microsoft Dynamics CRM 2011
Monday, September 16, 2013
How to create a Custom View using the Advanced Search in Dynamics CRM
by Carmel Schvartzman
Sunday, September 15, 2013
Step-By-Step How to create a Web Resource
by Carmel Schvartzman
- In this walkthrough we will learn How to create a Web Resource in Dynamics CRM 2011. A Web Resource is a virtual html, jscript, css, picture or Silverligth file stored in the CRM database, and identified by a unique URL. After creation, a Web Resource can be used in many CRM Forms, enhancing its functionality and/or appeareance. For Example, we can use a Web Resource to open the CRM Official site on our Form:

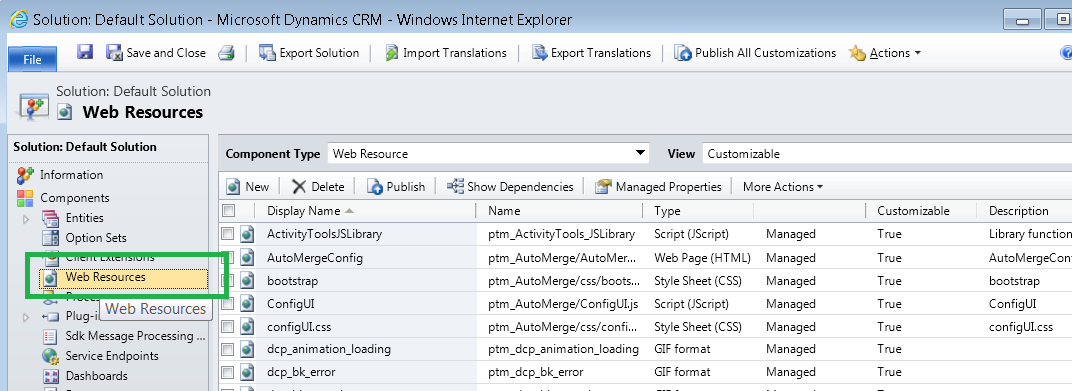
- In order to create a Web Resource, go to the Customizations section and select "Web Resources":

- There click on the "New" button:

- On the dialog that opens, fill out the required field "Name" with some relevant name, and the "Display Name" with the same name expressed in some friendly way. Open the drop down list on the "Type" field. There you can see the different types of Web Resources you can create: pictures, Silverlight, javascript code, and html markup: select "Web Page":

- As you can see, exists the option to upload a css, html, js, gif, silverlight file. However, for some few lines of code we'll prefere to use the Text Editor:

- Here you can choose between the Source and the Rich Text tabs. Select the Source tab:

- Opening it we get some standard markup:

- We'll extend the markup with some code. Go to the Rich Text tab and type the following line (you can use the rich editor buttons):

- Let's say we want to add an hyperlink to the html. Press the "Add Hyperlink" button, and type some url:

- Let's customize the hyperlink using the Source Tab. Find the <a> tag and change the displayed link text to whatever you want:

- Finally, Save the Web Resource and Publish it:

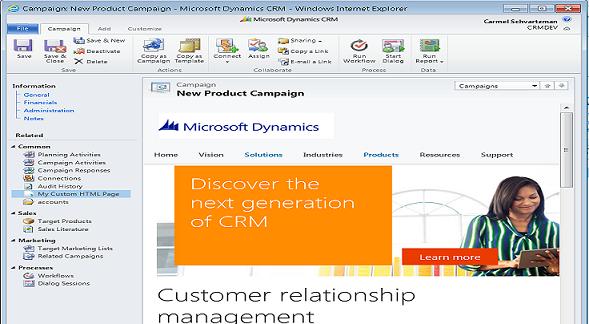
- If you want to add the Web Resource to a Form, refer to this walkthrough. This is how you can use the Web Resource on the CRM Form:

And the link will open the Crm Official site:
That's all...Enjoy Dynamics CRMכתב: כרמל שוורצמן

Subscribe to:
Posts (Atom)